It’s interesting to know how Magento 2 works “under the hood” not only for developers but for all the people, who work with the platform. Not everyone has a possibility to dig in the code deeply enough in order to check the details. In this post we will put Magento 2 request flow in layman’s terms.
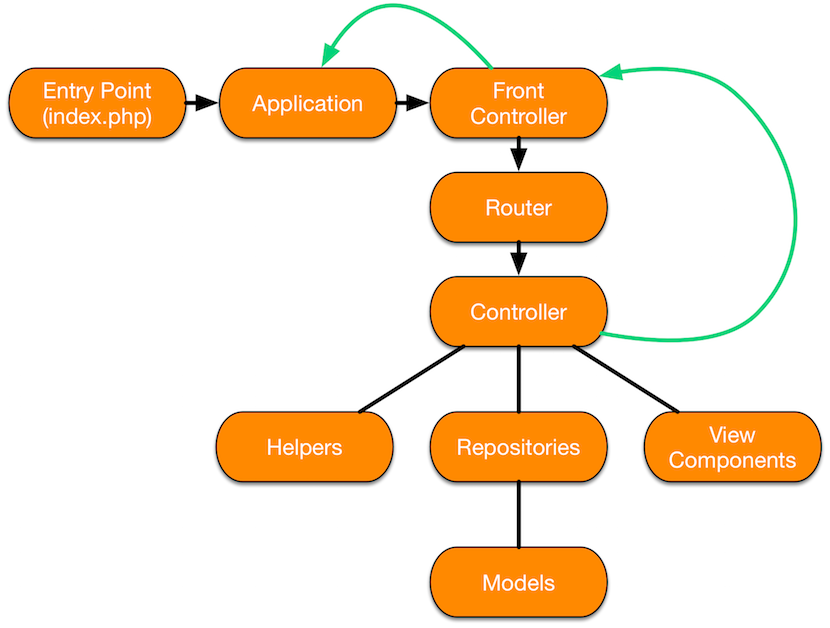
Request flow usually means a request lifecycle from going through a certain URL by user’s browser to a completely rendered page. As every other web application, Magento has an entry point – a place where the request processing starts on the platform side. The entry point for Magento standard requests is index.php file or pub/index.php file, depending on the current running mode default/developer/production. No matter what page you visit, this file will be a part of the request flow. The logic inside this file loads a bootstrap, then creates and runs the application. The bootstrap is responsible for autoloading and initial application running. Autoloading is a logic that allows to connect all files in the application together and use code from one file in another one. The initial application execution means choosing a correct application part for executing further processes. There are few application types in Magento 2 such as Http (for standard pages), Cron (for running scheduled processes such as price rules calculation), Shell (for running different shell commands of the platform) etc. In this post we are reviewing the standard Http application.
Among the initial processes we have the main components initialization: error handler, object manager etc. Once the main components have been registered, the routing logic takes place. The routing system tries to recognize the request by its URL, then loads the corresponding part of the platform that can handle the request. The routing flow is controlled by a front controller class. The front controller class iterates through all registered routers in the system in an attempt to find an appropriate router. There are few routers registered in Magento 2 out of the box:
- Base Router
- CMS Router
- UrlRewrite Router
- Default Router
- REST Router
Each router operates with a group of controllers that are assigned to a current router. Controller is the final routing component. Almost every URL in Magento has a corresponding controller – a place where the request should come after the system has been initialized but before the further business logic is executed.
The controller coordinates further actions that should be performed upon the request.
Let’s take a product view page loading as an example. In this case, the product view page controller (this page and all other pages have their own controllers) performs the following set of operations:
- Extracts category ID, product ID and additional options from the current URL.
- Attempts to initiate the product using the product’s helper. If there’s no such product – redirects to a 404 page.
- Prepares helper for page rendering.
- Renders the page using view components.
Helpers in Magento are classes that contain useful logic for some universal operations. In the current example, the product helper initializes product by getting it from the database. In Magento 2 the system uses repositories for working with some database entities, such as products. Repository is a logic that allows performance of basic operations on different entities: get an entity from the database, save an entity to the database, remove an entity from the database etc. The repository interacts with the database using models. Models in Magento are classes that contain a low-level logic for working with the database.
The view components in Magento 2 are represented by Result Page class, Layout class, blocks classes and templates. Page class is responsible for the final content rendering from the layout. Layout class contains all information about the page components: containers, blocks, UI Components etc. Block is a class that represents a separate functional and visual part of the page (header, sidebar, footer etc).
At this stage we have all necessary data for sending the page back to the client’s browser. After all operations in the controller have been executed it sends the information about the rendered page back to the Application class (the same class from which the execution flow started). Finally, the Application class sends the response to the output (client’s browser).
See the flowchart below with the summarized information about the request execution flow.

We hope this information helped you better understand the request lifecycle in Magento 2. Feel free to ask your questions in the comments below.
You may also be interested in:
