In our “Close Magento store for maintenance” blog post, we described how to close a store for maintenance and the restrictions we have for maintenance mode in Magento 1. Fortunately, or unfortunately, time goes fast, and things change. Magento application also evolves and becomes more adaptable to business needs
Today we already have Magento 2 and would like to discuss the opportunities that Magento Open Source and Adobe Commerce offer for website owners (merchants) regarding maintenance mode features. Also, we will overview their advantages and disadvantages and applicable cases of each solution. So, let’s get started.
What’s maintenance mode on Magento?
Firstly, let’s clarify a classic definition of a maintenance mode. Maintenance mode is a special mode in a Magento application used when software is temporarily offline for maintenance. In the case of e-commerce platforms, it’s a significant notice to inform customers and search engine crawlers that a website will be available as soon as possible.
How does the Magento maintenance mode work?
IIn Magento, maintenance mode does the following:
- Stops visitors’ activities on a storefront. Visitors will see a single “Service Unavailable” page and cannot go through the website pages.
- Stops system processes that Magento runs by a CRON.
- Returns 503 server error response code – in other words, your website is currently down. Search engines read the 503 response about downtime and do not change the existing website SEO.
Sounds interesting? Let’s continue.
4 Ways to Enable Maintenance Mode in Magento?
1. Via a native tool available in Magento 2 eCommerce platform
Keep in mind that this is the most popular way to enable maintenance mode which requires the following:
- Installed Magento 2 e-commerce platform
- Magento 2 should be running in a “production” mode.
The process of enabling maintenance mode consists of the following steps::
- Allow access to a website from specific IP addresses:
bin/magento maintenance:allow-ips <ip address> .. <ip address> [--none]
- Enable a maintenance mode
bin/magento maintenance:enable
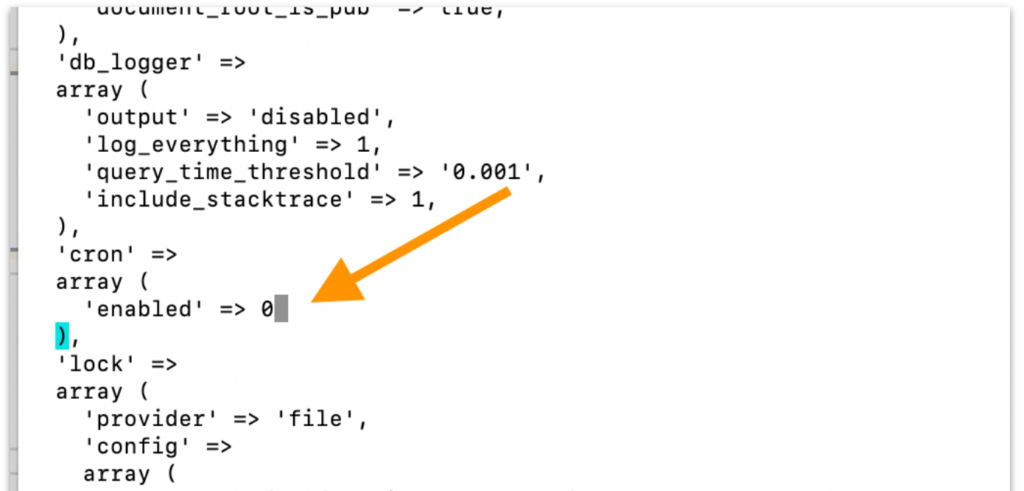
- Stop Magento Crons. Update app/etc/env.php and add the following lines to stop cron jobs:
'cron' => array (
    'enabled' => 0
),
- Flush configuration cache by running the following:
bin/magento cache:clean config
- Unlock and kill any existing cron tasks using these commands (for the Adobe Commerce only):
php vendor/bin/ece-tools cron:kill
php vendor/bin/ece-tools cron:unlock
To disable a maintenance mode you need:
- Enable Magento CRONs through the changes in app/etc/env.php:
'cron' => array (
    'enabled' => 1
),
- Flush configuration cache
bin/magento cache:clean config
- Disable a maintenance mode
bin/magento maintenance:disable
Features of using maintenance through the Magento 2 framework:
- Magento 2 e-commerce platform should be installed;
- Magento 2 is running in a “production” mode;
- Whitelist of IP addresses separated by comma defined in <Magento_root_folder>/var/.maintenance.ip;
- <Magento_root_folder>/var/.maintenance.flag is created (indicates that Magento is in maintenance mode);
- bin/magento maintenance:enable CLI command does not impact Magento CRON jobs, so they should be stopped additionally.
- We may use skins for the different websites/stores in the case of a multi-store Magento 2 setup.
However, there are additional tools that also may help merchants to enable maintenance mode for the website(s):
- Content Delivery Network (CDN)
- Web server
- Magento 2 Website Restriction feature (available only to Adobe Commerce)
2. Via CDN
Every popular CDN contains an access restriction feature that can block access to visitors and search engine crawlers to a website or websites (in the case of the multi-store). Still, the software will not be switched into a maintenance mode by the bin/magento maintenance:enable CLI command.
CDN blocking can be used when you need to test some website functionality but do not want to allow access to it to all potential visitors.

To enable a maintenance mode through the CDN, use the following next steps:
- Add the IP address to users which will not be blocked.
- Specify the content of a 503 page.
- Enable maintenance mode in CDN.
or merchants using Adobe Commerce hosted on the Cloud, we suggest following this step-by-step guide to enable maintenance mode in Fastly CDN, part of the Adobe Cloud infrastructure:
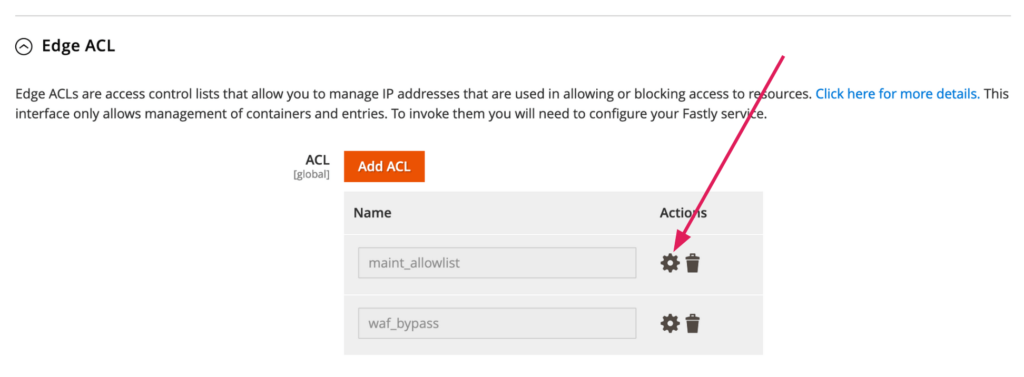
- Login to Magento admin and go to STORES > Settings > Configuration > ADVANCED > System > Full Page Cache > Fastly Configuration
- Add the IP addresses of visitors who can access the website.

- Specify a content of 503 page
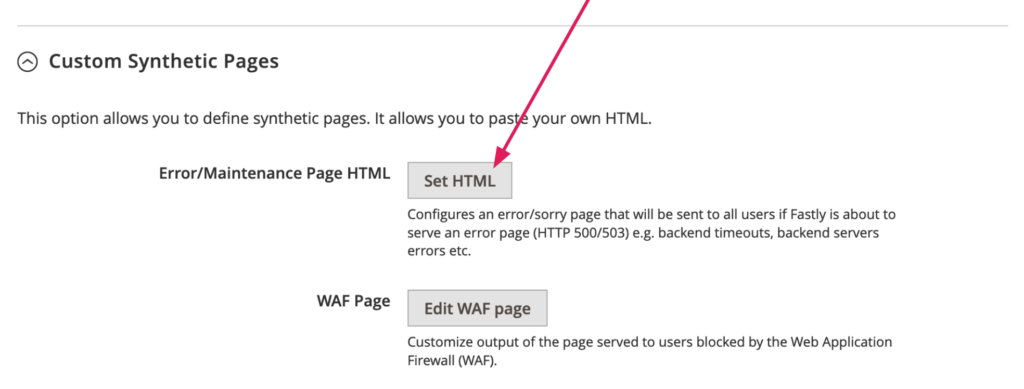
If you have <Magento_root_folder>/var/.maintenance.ip file you may use the following command to save your time and add all IP addresses to Fastly:
bin/magento fastly:maintenance -u
- Enable maintenance mode

Or you may use the next CLI command:
bin/magento fastly:maintenance -e
To disable a maintenance mode in Fastly, you may click on the “Enable/Disable” button in Magento admin or run the following CLI command:
bin/magento fastly:maintenance -d
The disadvantage of enabling a maintenance mode through the CDN is that you can not have a different content (skin) for the “503 Service Unavailable” page because CDN allows specifying a single page content to all websites in case of a multi-store setup.
Features of using maintenance through the CDN:
- Fastly returns 503 header code.
- Magento itself is not put into maintenance mode.
- Merchants are not able to set/use a separate maintenance page/message to a particular website (in the case of multi-store)
- var/.maintenance.ip can be used to populate Fastly “maint_allowlist”
- var/.maintenance.flag is NOT created (so technically, Magento is not in a maintenance mode)
3. Via Web-server
This approach is very similar to CDN access restrictions and applicable for cases when a Magento application is not installed or we need to restrict access to particular websites; that is a primary benefit of this approach – merchants may restrict access to a specific website in the case when Magento is configured as a multi-store (see a schema below).
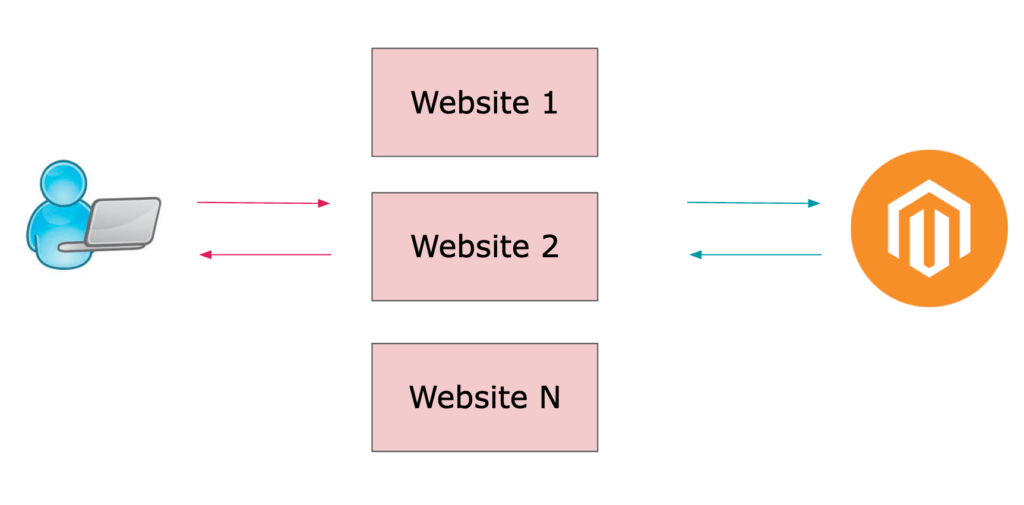
Regarding the schema merchants may block access to the “Website 1” but “Website 2” and “Website N” will be available to all users.
Also, this approach is recommended for use by Adobe during the Magento application upgrade.
The disadvantage of this solution is that merchants need to involve hosting providers to configure the web server properly.
Features of using maintenance through the web server:
- Experience Adobe documentation recommends enabling a maintenance mode via a web server during a Magento upgrade.
- Maintenance mode can be enabled for all websites or for particular ones.
- Magento itself can be switched to a maintenance mode or not.
- The separate maintenance page can be set to a particular website (in the case of multi-store).
- Allowed IPs and a flag for maintenance mode are set in the web server config.
4. Via Magento 2 Website Restriction
As mentioned above, this is an exclusive feature of Adobe Commerce – “Private sales and events.”
This approach can be used when merchants want to make some updates on a particular website and temporarily close it for visitors. For example, a catalog contains thousands of products, and merchants need to immediately update product prices and, at the same time, prevent customers from purchasing products with outdated prices.
Enabling a maintenance mode through the “Private sales and events” requires the following steps:
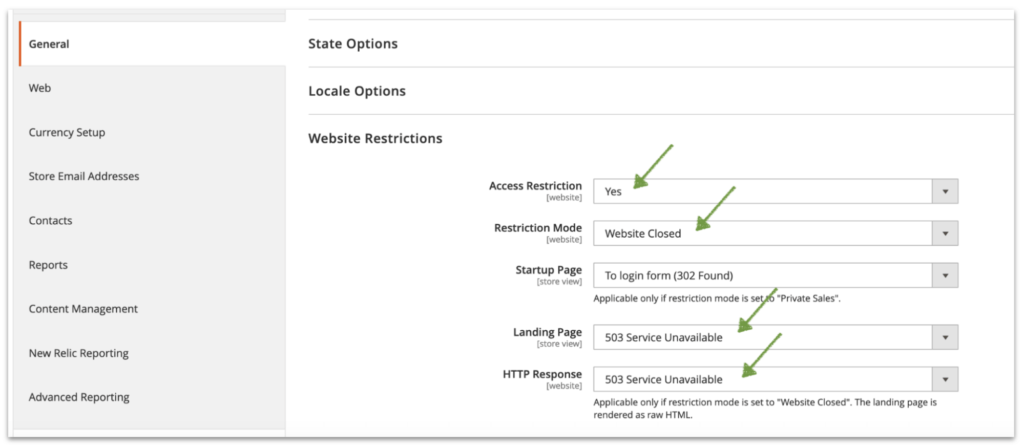
- Login to Magento admin and go to STORES > Settings > Configuration > GENERAL > General > Website Restrictions
- Set the “Access Restriction” option to “Yes.”
- Set the “Restriction Mode” option to “Website Closed.”
- Select the needed CMS page which contains “Service Unavailable” page content in the “Landing Page” dropdown.
- Set the “HTTP Response” option to “503 Service Unavailable”.
Features of using maintenance through the “Website Restrictions” feature:
- The Magento application is installed and is not in maintenance mode.
- The CMS page can be set as a maintenance page for a particular website (in multi-store case).
- Does not require technical skills from merchants.
Maintenance mode skins
Out-of-the-box Magento 2 provides skins which can be used for the “503 Service Unavailable” page.
Technically a skin – is a folder in pub/errors/ folder with CSS, media and phtml templates for different types of errors (503, 404, etc). Skin can be passed to the Magento application through the $GET[‘skin’] variable.
Skin requirements:
- The name of the skin should follow to /^[a-z0-9_]+$/i pattern.
- A folder with a skin name should exist in <Magento_root>/pub/errors/ folder.
Best Magento practices to skin name:
- pub/errors/{name}, where {name} is the store code.
- To distinguish between stores and websites with the same instance use pub/errors/{type}–{name}. where {type} is either store or website and matches the MAGE_RUN_TYPE in your server configuration.
Best practices examples:
- pub/errors/shop1
- pub/errors/shop2
- pub/errors/website-shop1
- pub/errors/website-shop2
Skin folder structure:
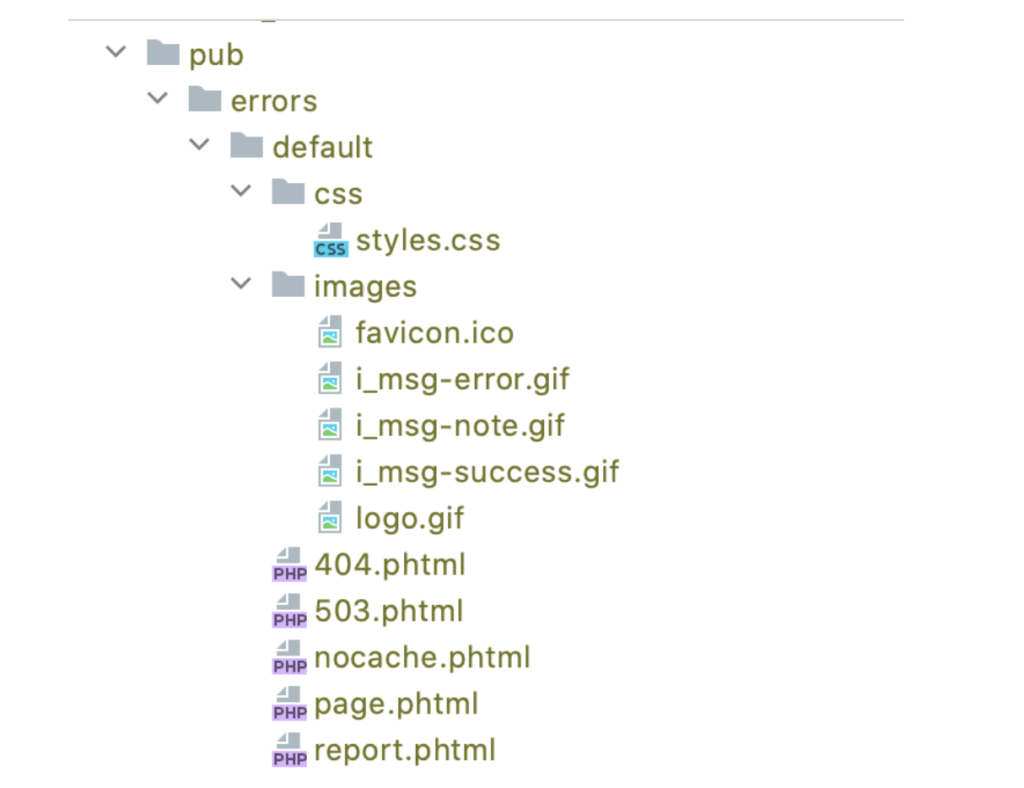
Default skin can be set in <Magento_root>/pub/errors/design.xml or <Magento_root>/pub/errors/local.xml:
<?xml version="1.0"?>
<!--
/**
* Copyright © Magento, Inc. All rights reserved.
* See COPYING.txt for license details.
*/
-->
<config>
   <skin>default</skin>
</config>
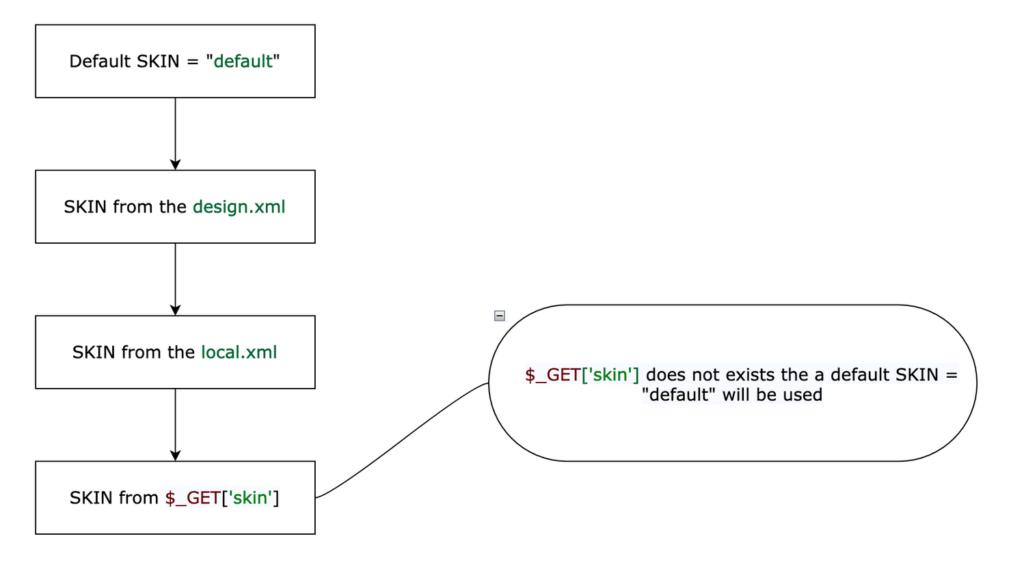
Magento application uses the following algorithm to detect a proper skin:
Final Conclusions
- Maintenance mode does not break SEO.
- The most popular ways merchants may enable or simulate a maintenance mode are overviewed. Each of these ways has its own benefits/disadvantages.
- Also, remember that Magento CRON jobs continue to work in maintenance mode and should be stopped if necessary.
Thanks for reading, and please leave your comments if you have any additional comments.
If you need help with maintaining your Magento/Adobe Commerce store, please have a look at Atwix Magento maintenance services.
